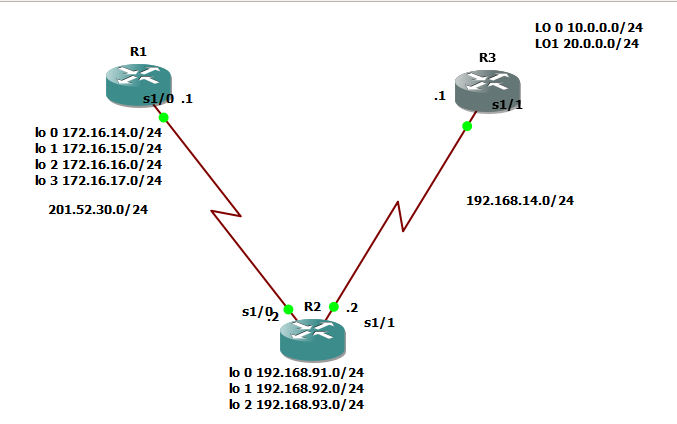
Hi there! Yup! No more dramas and long introduction this time as we have bunch of topics we need to cover for OSPF. This time, we will focus with configuration first. I have below the simple network diagram that we need to work with for the rest of OSPF CCNA topics.
The basic configuration are below if you don’t want to waste time with configuration:
@R1
enable
conf t
line console 0
password cisco
logging sync
exec-timeout 20 30
login
exit
line vty 0 15
password cisco
logging sync
exec-timeout 20 30
login
exit
hostname R1
enable secret class
service password-encryption
no ip domain-lookup
banner motd “AUTHORIZED ACCESS ONLY”
do wr
exit
en
conf t
int se 1/0
ip address 201.52.30.1 255.255.255.0
no shut
int lo 0
ip address 172.16.14.1 255.255.255.0
no shut
int lo 1
ip address 172.16.15.1 255.255.255.0
no shut
int lo 2
ip address 172.16.16.1 255.255.255.0
no shut
int lo 3
ip address 172.16.17.1 255.255.255.0
no shut
exit
do sh ip int br
@r2
enable
conf t
line console 0
password cisco
logging sync
exec-timeout 20 30
login
exit
line vty 0 15
password cisco
logging sync
exec-timeout 20 30
login
exit
hostname R2
enable secret class
service password-encryption
no ip domain-lookup
banner motd “AUTHORIZED ACCESS ONLY”
do wr
exit
en
conf t
int se 1/0
ip address 201.52.30.2 255.255.255.0
no shut
int se 1/1
ip address 192.168.14.2 255.255.255.0
no shut
int lo 0
ip address 192.168.91.1 2n55.255.255.0
no shut
int lo 1
ip address 192.168.92.1 255.255.255.0
no shut
int lo 2
ip address 192.168.93.1 255.255.255.0
no shut
exit
do sh ip int br
@ R3
enable
conf t
line console 0
password cisco
logging sync
exec-timeout 20 30
login
exit
line vty 0 15
password cisco
logging sync
exec-timeout 20 30
login
exit
hostname R3
enable secret class
service password-encryption
no ip domain-lookup
banner motd “AUTHORIZED ACCESS ONLY”
do wr
exit
en
conf t
int se 1/1
ip address 192.168.14.1 255.255.255.0
no shut
int lo 0
ip address 10.0.0.1 255.255.255.0
no shut
int lo 1
ip address 20.0.0.1 255.255.255.0
no shut
exit
do sh ip int br
OSPF CONFIGURATION SYNTAX
en
conf t
router ospf {process#}
network { directly connected networks when you use sh ip route} {wild card mask} {area#}
Please note:
Process# is not essential to be the same on all routers
Area# should be the same on all routers and we will discuss that later
Directly connected networks – networks which routers are those with a mark of “C” when you run sh ip route
Wild card mask– opposite of subnet mask of the directly connected networks
Let me walk you through on how to configure R1:
We conclude that we must have five networks and by using the configuration syntax, we must have the R1 configuration below:
en
conf t
router ospf {process#}
network { directly connected networks when you use sh ip route} {wild card mask} {area#}
en
conf t
router ospf 100
network 172.16.14.0 0.0.0.255 area 0
network 172.16.15.0 0.0.0.255 area 0
network 172.16.16.0 0.0.0.255 area 0
network 172.16.17.0 0.0.0.255 area 0
network 201.52.30.0 0.0.0.255 area 0
exit
do show ip protocols
en
conf t
router ospf 100
network 172.16.14.0 0.0.0.255 area 0
network 172.16.15.0 0.0.0.255 area 0
network 172.16.16.0 0.0.0.255 area 0
network 172.16.17.0 0.0.0.255 area 0
network 201.52.30.0 0.0.0.255 area 0
exit
do show ip protocols
do show ip protocols – or show ip protocols on global configuration, is the show commands to know what protocol is running on the router and the networks configured, we will deal further about this when we reached ESTABLISHING NEIGHBOR ADJACENCY TOPIC
R1(config)#do show ip protocols
Routing Protocol is “ospf 100”
Outgoing update filter list for all interfaces is not set
Incoming update filter list for all interfaces is not set
Router ID 172.16.17.1
Number of areas in this router is 1. 1 normal 0 stub 0 nssa
Maximum path: 4
Routing for Networks:
172.16.14.0 0.0.0.255 area 0
172.16.15.0 0.0.0.255 area 0
172.16.16.0 0.0.0.255 area 0
172.16.17.0 0.0.0.255 area 0
201.52.30.0 0.0.0.255 area 0
Reference bandwidth unit is 100 mbps
Routing Information Sources:
Gateway Distance Last Update
Distance: (default is 110)
We can use command “sh ip route” but OSPF will not appear because only one router is configured.
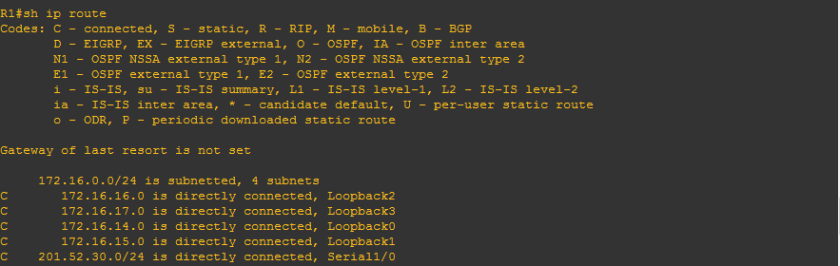
R1(config)#do sh ip route
Codes: C – connected, S – static, R – RIP, M – mobile, B – BGP
D – EIGRP, EX – EIGRP external, O – OSPF, IA – OSPF inter area
N1 – OSPF NSSA external type 1, N2 – OSPF NSSA external type 2
E1 – OSPF external type 1, E2 – OSPF external type 2
i – IS-IS, su – IS-IS summary, L1 – IS-IS level-1, L2 – IS-IS level-2
ia – IS-IS inter area, * – candidate default, U – per-user static route
o – ODR, P – periodic downloaded static route
Gateway of last resort is not set
172.16.0.0/24 is subnetted, 4 subnets
C 172.16.16.0 is directly connected, Loopback2
C 172.16.17.0 is directly connected, Loopback3
C 172.16.14.0 is directly connected, Loopback0
C 172.16.15.0 is directly connected, Loopback1
C 201.52.30.0/24 is directly connected, Serial1/0
Let us configure R2:
en
conf t
router ospf 100
network 192.168.91.0 0.0.0.255 area 0
network 192.168.92.0 0.0.0.255 area 0
network 192.168.93.0 0.0.0.255 area 0
network 192.168.14.0 0.0.0.255 area 0
network 201.52.30.0 0.0.0.255 area 0
exit
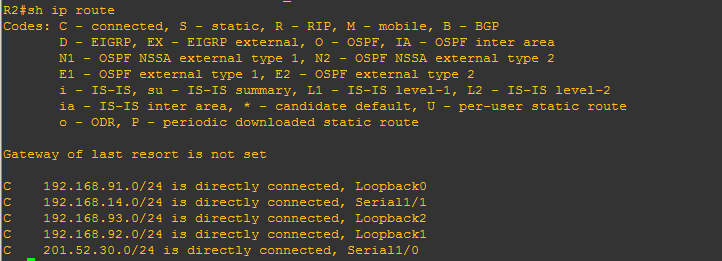
do sh ip route
and we would see
You would see above
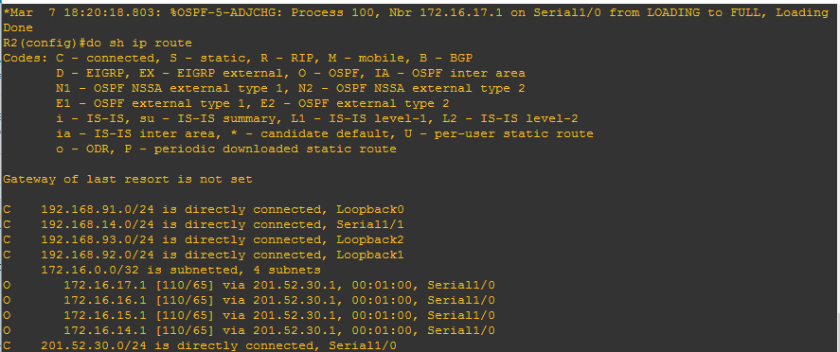
*Mar 7 18:20:18.803: %OSPF-5-ADJCHG: Process 100, Nbr 172.16.17.1 on Serial1/0 from LOADING to FULL, Loading Done
The word FULL is just one of the stages of establishing neighbor adjacency which we will discuss later as we go on.
And since two routers are already configured with OSPF , we would see that there are 4 OSPF networks appearing above.
We’ll proceed R3 configuration:

R3 configuration below:
en
conf t
router ospf 100
network 192.168.14.0 0.0.0.255 area 0
network 20.0.0.0 0.0.0.255 area 0
network 10.0.0.0 0.0.0.255 area 0
exit
do sh ip route
Let us try to check the routing table of R1, R2 and R3
R1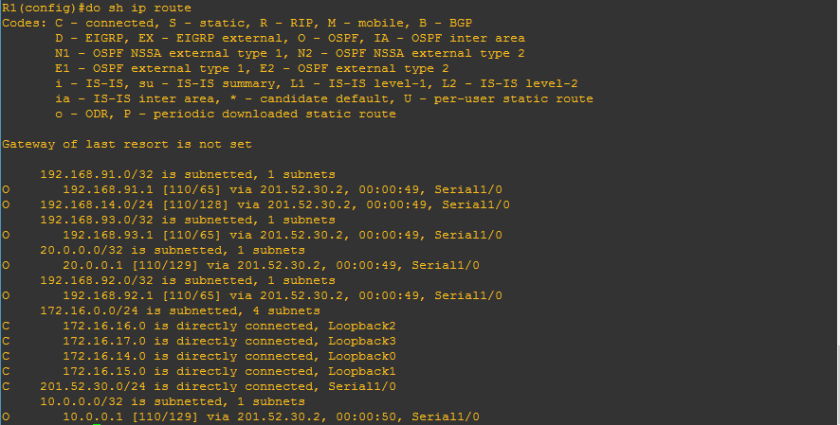
R2

R3
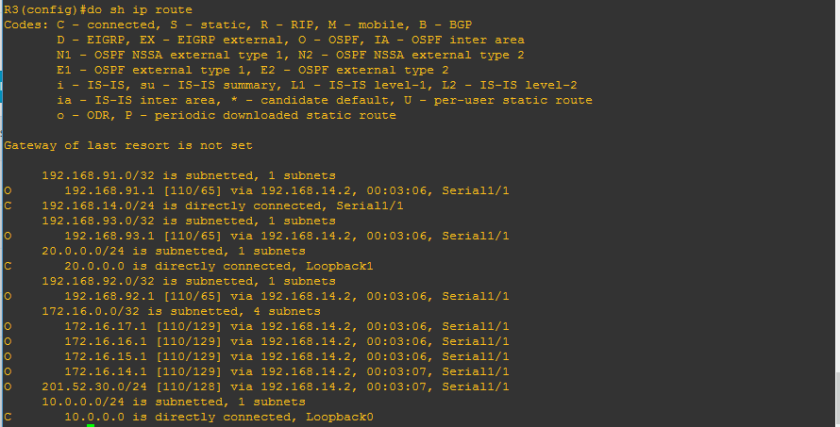
Lastly, mate before we proceed let us try to check R3 and analyze it.
From the figure above, we conclude that router 3 has three directly connected networks and 8 remote networks. Let us check if those 3 directly connected routers has a mark of “C”
We can use “sh ip route connected” to know only directly connected networks
R3#sh ip route connected
C 192.168.14.0/24 is directly connected, Serial1/1
20.0.0.0/24 is subnetted, 1 subnets
C 20.0.0.0 is directly connected, Loopback1
10.0.0.0/24 is subnetted, 1 subnets
C 10.0.0.0 is directly connected, Loopback0
We can use “sh ip route ospf” to show remote networks which has OSPF protocols
R3#sh ip route ospf
192.168.91.0/32 is subnetted, 1 subnets
O 192.168.91.1 [110/65] via 192.168.14.2, 00:09:37, Serial1/1
192.168.93.0/32 is subnetted, 1 subnets
O 192.168.93.1 [110/65] via 192.168.14.2, 00:09:37, Serial1/1
192.168.92.0/32 is subnetted, 1 subnets
O 192.168.92.1 [110/65] via 192.168.14.2, 00:09:37, Serial1/1
172.16.0.0/32 is subnetted, 4 subnets
O 172.16.17.1 [110/129] via 192.168.14.2, 00:09:37, Serial1/1
O 172.16.16.1 [110/129] via 192.168.14.2, 00:09:37, Serial1/1
O 172.16.15.1 [110/129] via 192.168.14.2, 00:09:37, Serial1/1
O 172.16.14.1 [110/129] via 192.168.14.2, 00:09:37, Serial1/1
O 201.52.30.0/24 [110/128] via 192.168.14.2, 00:09:37, Serial1/1
Yep, it is confirmed that we got 8 remote networks so it is confirmed that we can reach all those remote networks via ospf protocol.
Let us just analyze one route line:
O 192.168.92.1 [110/65] via 192.168.14.2, 00:09:37, Serial1/1
172.16.0.0/32 is subnetted, 4 subnets
On the line of routing table above which shows that 192.168.92.1 as directly connected networks wherein OSPF is running, we can see [110/65] , I hope that i explained it already to you that this is [administrative distance/ metric]. We will discuss that later as we go on. Also, we will see line ” via 192.168.14.2″ and Serial1/1, it only means that we are able to connect with that remote network by the help of serial 1/1 which has ip address of 192.168.14.2.
Yep, that’s all for now but no worries, I will post immediately the continuation of this OSPF series so that I could help you further to read routing tables.
